

Table of Contents
- Why Dethatching Matters Before Overseeding
- How Thatch Blocks Seed Success
- Best Time to Overseed Lawn After Dethatching
- Step-by-Step Dethatching Process
- Lawn Renovation Equipment Hire for Dethatching and Overseeding
- Benefits of Core Aeration After Dethatching
- Common Mistakes When Dethatching Before Overseeding
- Frequently Asked Questions
Last Updated: September 22, 2026
Why Dethatching Matters Before Overseeding
Dethatching before overseeding is one of the most important steps in lawn renovation. When thatch builds up, it creates a barrier that stops new seed from making contact with soil. Without that contact, seeds can't germinate properly.
Think of thatch like a dense mat sitting on top of your lawn. Over time, dead grass, stems and organic material accumulate between the green grass blades and the soil surface. A small amount is normal, but excessive thatch blocks water, air and nutrients from reaching the root zone. It also prevents new seed from settling into the soil where it needs to be.
At MarKay Outdoors, we help Mackay homeowners and contractors tackle lawn renovation projects with the right equipment. Dethatching is the critical first step that makes everything else work better. When you remove that thatch layer, you're preparing a clean surface for seed to actually establish.

The benefits compound quickly. Better seed-to-soil contact means faster germination. Improved air and water movement means healthier roots. A properly dethatched lawn recovers faster and looks fuller within weeks.
How Thatch Blocks Seed Success
Excessive thatch creates several problems for overseeding. The most obvious is mechanical, seed simply can't reach soil. But the issues go deeper.
When thatch is thick, it stays wet longer after rain or watering. This creates an ideal environment for fungal diseases. New seedlings are particularly vulnerable to damping-off disease, which kills them before they establish roots. A damp thatch layer sitting above your seed is basically a disease incubator.
Thatch also competes with new seed for moisture. As the thatch dries out, it pulls water away from the soil below. New seeds need consistent moisture to germinate. If they're sitting in a thatch layer that's drying faster than the soil underneath, they'll fail.
Air movement is another factor. Thatch blocks oxygen from reaching the seed and emerging roots. Grass seedlings need oxygen to respire and develop. Thick thatch essentially suffocates them.
Finally, thatch creates an unstable growing surface. Seeds that do make contact with soil can shift and move as the thatch layer settles. This breaks the seed-to-soil contact that's essential for germination.
Removing the thatch solves all of these problems at once. You're not just clearing debris, you're creating the conditions that allow seed to actually work.
Best Time to Overseed Lawn After Dethatching
The timing of overseeding after dethatching depends on your local climate and the grass type you're planting. In this region, autumn and spring are the ideal windows for cool-season grass varieties.
After dethatching, wait until the lawn has settled and dried slightly before overseeding. This usually takes 3-5 days. The soil needs to be moist but not waterlogged. If you overseed immediately after dethatching while the soil is still saturated, the seed can rot before it germinates.
Soil temperature matters too. Cool-season grasses germinate best when soil temperatures are between 13°C and 18°C. Autumn (March to May) and spring (September to November) hit this window consistently. Avoid summer and winter extremes.
After overseeding, keep the soil consistently moist for the first 2-3 weeks. This is critical. New seed needs constant moisture to germinate. Once grass is established and growing, you can reduce watering frequency.
Step-by-Step Dethatching Process
Dethatching is straightforward once you have the right equipment. Here's how to do it properly.
Step 1: Mow the lawn short
Start by mowing your lawn to about 2-3 cm. This removes most of the green growth and makes it easier for the dethatcher to work. Set your mower to its lowest setting.
Step 2: Water the lawn lightly
Water the lawn a day or two before dethatching. The soil should be moist but not waterlogged. Wet soil is harder to work with and can compact. Dry soil is too hard for the dethatcher to penetrate effectively.
Step 3: Run the dethatcher
A mechanical dethatcher pulls up thatch and dead grass. Push it across the lawn in overlapping passes, similar to mowing. The machine's tines dig into the soil surface and pull up the accumulated material.
Make multiple passes in different directions. This ensures you catch thatch throughout the lawn. One direction alone won't remove everything.
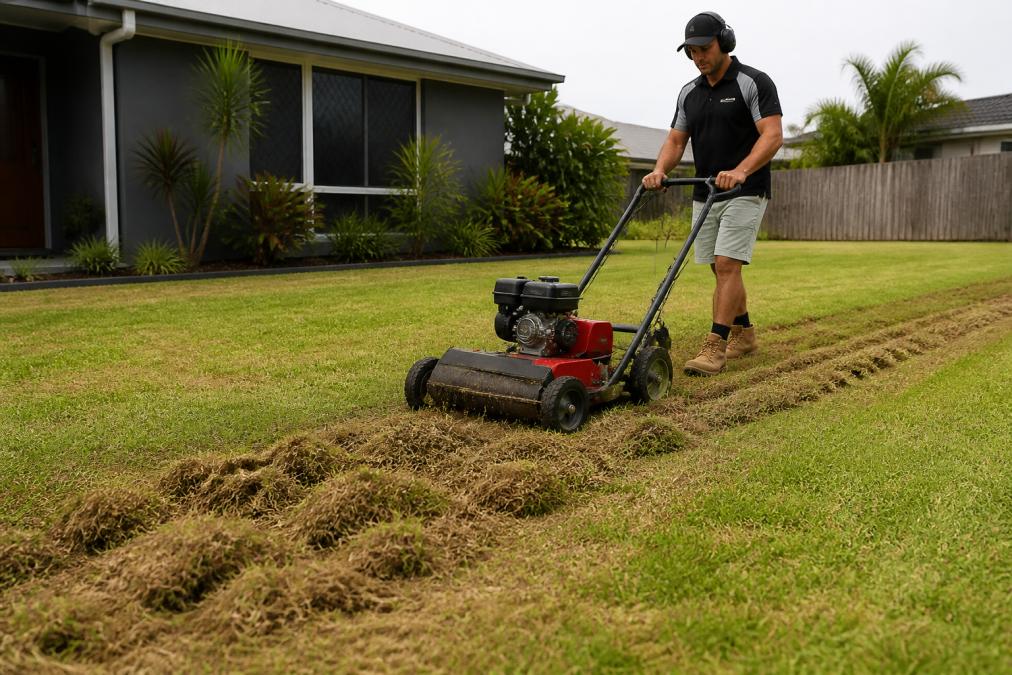
Step 4: Collect the removed material
The dethatcher pulls material to the surface. Rake it up and collect it in bags or a trailer. This material is bulky but can go to garden waste collection. Don't leave it on the lawn, it blocks light and air from reaching new seed.
Step 5: Level low spots
Once the thatch is removed, you may see depressions or low areas in the lawn. These are places where soil has compacted over time. Mark these spots for topdressing later.
Step 6: Let the lawn settle
Give the lawn 3-5 days to settle after dethatching. The soil needs to firm up slightly. This is also a good time to aerate if your soil is compacted.
Lawn Renovation Equipment Hire for Dethatching and Overseeding
Dethatching requires specialised equipment. Hiring is far more practical than buying for a one-time project.
MarKay Outdoors offers Dethatcher Hire Mackay for homeowners and contractors. A mechanical dethatcher does in hours what would take days with a rake. The machine pulls up thatch efficiently and collects much of the material for easy removal.
Dethatcher Hire Mackay | Lawn Scarifier →
If you're planning a full lawn renovation, consider the Lawn Care Equipment Hire Mackay package. It includes a dethatcher, core aerator, rakes and collection bags all on one trailer. You pick up once and have everything you need for the main renovation steps. This saves time and simplifies transport.

For larger properties or heavily compacted soil, core aeration after dethatching makes a real difference. The aerator removes small plugs of soil to relieve compaction and improve water and air movement. Many contractors combine both steps in a single hire period.
Same-day and 24-hour hire options mean you can fit lawn renovation around your schedule. Equipment is well-maintained and ready to use. Online booking makes it straightforward to reserve what you need.
Benefits of Core Aeration After Dethatching
Core aeration is the logical next step after dethatching. While dethatching removes the thatch layer, aeration addresses soil compaction underneath.
Compacted soil restricts root development. Grass roots can't penetrate hard soil effectively. Water and nutrients move through compacted soil slowly. Air can't reach the root zone. All of this weakens the lawn and slows recovery.
A core aerator removes small plugs of soil, typically about 7-10 mm in diameter. These holes create pathways for air, water and nutrients to move into the root zone. The removed soil plugs break down and help improve soil structure.
Aeration is especially valuable before overseeding. The small holes give new seed direct contact with soil. The improved soil conditions help seedlings establish faster and develop stronger roots.
Many DIY renovators see visible improvement within 2-3 weeks of aeration. The lawn looks denser, feels firmer underfoot and recovers faster from foot traffic.
Common Mistakes When Dethatching Before Overseeding
Understanding what goes wrong helps you avoid the same pitfalls.
Dethatching too early or too late
Timing matters. Dethatching in winter when soil is cold and wet can damage the lawn and leave it vulnerable. Summer dethatching stresses the grass when it's already heat-stressed. Stick to autumn and spring for best results.
Not removing the collected material
Many people dethatch but leave the pulled-up material on the lawn. This defeats the purpose. The thatch needs to be raked up and removed. Otherwise, it continues to block light and air.
Overseeding immediately after dethatching
The soil needs time to settle. If you overseed while the lawn is still raw from dethatching, the seed struggles to make good contact with soil. Wait 3-5 days.
Watering inconsistently after overseeding
New seed needs constant moisture. Letting it dry out for even a day or two can kill germination. Set up regular watering and stick to it for the first 2-3 weeks.
Skipping aeration
If your soil is compacted, dethatching alone won't fix it. You're removing the dead material on top, but the compacted soil underneath still restricts root development. Aeration completes the job.
Not mowing short before dethatching
Leaving the grass tall makes dethatching less effective. The machine can't reach the thatch properly. Mow short first, it makes a real difference.
Dethatching before overseeding transforms a tired lawn into something worth maintaining. It's not glamorous work, but it's the foundation that makes everything else possible. When you remove that thatch barrier, you're giving new seed the conditions it actually needs to grow.
The right equipment makes the job manageable. MarKay Outdoors provides dethatcher hire and lawn care equipment packages designed for DIY renovators and contractors in Mackay.
Turf Australia's lawn care guidelines
CSIRO's soil health and compaction research
Department of Agriculture and Fisheries Queensland lawn establishment guide
Frequently Asked Questions
Is it necessary to dethatch before overseeding?
Dethatching before overseeding is highly beneficial, especially if your lawn has more than 1.5 cm of thatch build-up. Excessive thatch prevents grass seed from making contact with soil, reducing germination rates significantly. If your lawn feels spongy underfoot or water pools on the surface, dethatching will improve seed establishment and overall lawn health.
What is the best time of year to dethatch and overseed?
Autumn is ideal for dethatching and overseeding in most regions, as cooler temperatures and increased rainfall support seed germination. Spring is also suitable. Avoid dethatching during hot, dry periods or when grass is stressed. Allow 1-2 weeks after dethatching before overseeding to let the lawn recover and for any remaining debris to settle.
What are the benefits of core aeration after dethatching?
Core aeration removes soil plugs to relieve compaction and create pathways for air, water and nutrients to reach the root zone. Combined with dethatching, aeration prepares the soil perfectly for seed germination and establishment. This two-stage approach addresses both surface thatch and subsurface compaction, resulting in stronger, healthier grass growth.
Can I overseed immediately after dethatching?
Wait 1-2 weeks after dethatching before overseeding. This allows the lawn to recover from the mechanical stress, debris to settle, and soil conditions to stabilise. Seeding too soon can result in poor seed contact with soil and reduced germination. If you're also aerating, complete that before overseeding as well.