

Table of Contents
- Why Stump Grinder Safety Matters Before You Start
- Essential Stump Grinder Safety Gear You Need
- Step 1: Prepare the Site and Check the Machine
- Step 2: Position the Grinder and Start Safely
- Step 3: Grind the Stump with Controlled Movements
- Best Practices for Stump Removal and Cleanup
- Common Stump Grinder Problems and Troubleshooting
- Conclusion
- Frequently Asked Questions
Last Updated: September 9, 2026
Why Stump Grinder Safety Matters Before You Start
A stump grinder is one of the most effective machines for removing unwanted tree stumps, but it demands respect. Operating this equipment without proper precautions can lead to serious injury from flying debris, the high-speed cutting wheel, or the machine's weight. Learning how to use a stump grinder safely is not optional, it is the difference between a straightforward job and a trip to the emergency department.

Stump grinder safety should be your first consideration. The machine is a tool, and like any powerful tool, it is only as safe as the person running it. Before you pull the starter cord, you need a clear plan for personal protection, site assessment, and controlled operation.
Most incidents happen when people rush. They skip the pre-check, ignore a hidden obstacle, or try to force the cutting wheel through material it cannot handle. The good news is that nearly every one of these incidents is preventable with a methodical approach. Below, we'll walk through the exact steps we recommend for safe stump grinding, from the gear you need to the final cleanup.
Essential Stump Grinder Safety Gear You Need
Personal protective equipment (PPE) is your last line of defence. The cutting wheel throws wood chips, soil, and small stones at high velocity, while the petrol engine generates substantial noise. Proper gear is non-negotiable for anyone serious about stump grinder safety.
- Safety glasses or a full face shield: Protect your eyes from flying debris. A face shield offers better coverage when grinding close to the ground.
- Ear protection: Stump grinders are loud. Prolonged exposure without ear muffs can cause permanent hearing damage.
- Heavy-duty gloves: These improve your grip on the controls and protect your hands from splinters and vibration.
- Steel-capped boots: A falling stump section or the machine itself can crush your feet. Steel caps are essential.
- Long trousers and a long-sleeved shirt: Durable fabric protects your skin from thrown debris and minor scrapes.
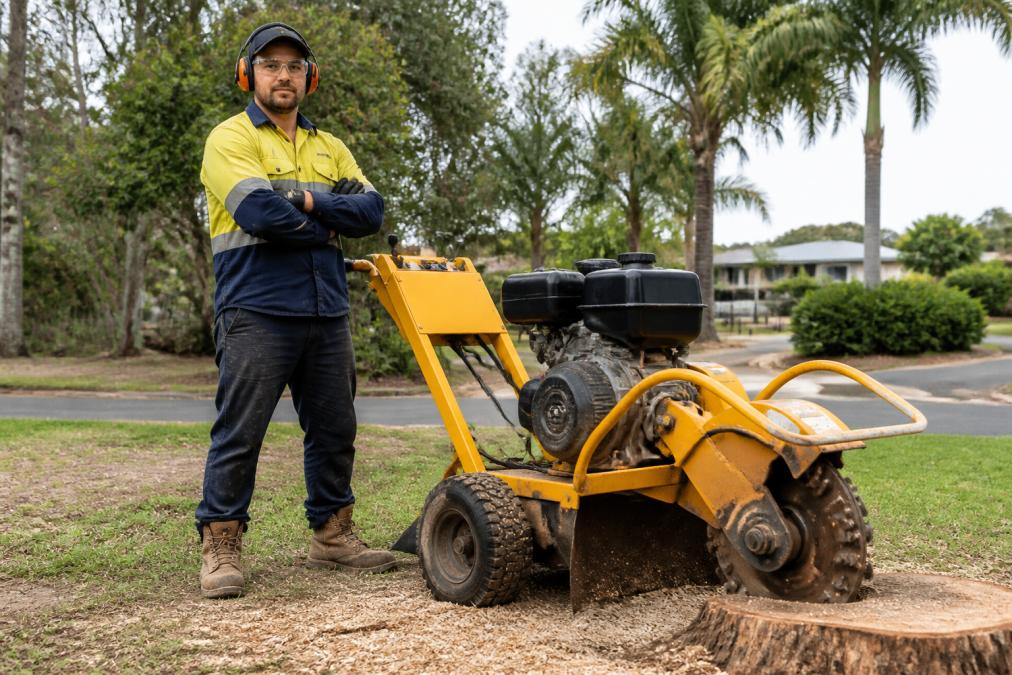
Check your gear before every session. Cracked lenses, worn gloves, or damaged hearing protection should be replaced immediately. This equipment is inexpensive compared with the cost of an injury.
Step 1: Prepare the Site and Check the Machine
Preparation begins long before the grinder touches the stump. A safe job starts with a clean, well-planned site. This first phase is where you spot the hazards that cause most problems.
Start by clearing the area. Remove rocks, loose timber, garden hoses, and any debris the cutting wheel could pick up and throw. Mark out underground services, such as water pipes or irrigation lines, so you know exactly where not to dig. If you are unsure what lies beneath, stop and investigate before proceeding.
Next, walk the perimeter. Confirm there is enough space to manoeuvre the machine and that no bystanders or pets are within range of flying debris. A safe exclusion zone is generally several metres around the stump. If you are working near a public footpath or a neighbour's fence, take extra care.
Finally, inspect the stump grinder itself. Check the cutting teeth for wear or damage, confirm the guards are in place, and look for fuel or oil leaks. On a hire machine, report any fault before you begin. A well-maintained unit, like those prepared by MarKay Outdoors for stump grinder hire [in Mackay(/blogs/news/diy-stump-grinding-mackay-guide) | markayoutdoors.com.au], will have sharp teeth and secure guards, but a quick visual check on your end is still wise.
Step 2: Position the Grinder and Start Safely
With the site prepared, you can bring the machine into position. Correct positioning makes the job easier and keeps you in control. The grinder should sit on firm, level ground with the cutting wheel aligned over the stump's edge.
Before starting the engine, check the controls. Locate the throttle, the cutting wheel engagement lever, and the emergency stop. Familiarise yourself with each one so you can react without hesitation. If you are using a hire machine and the controls differ from what you expect, take a few minutes to review the setup.
Starting procedure is straightforward but specific. Engage the choke and pull the starter cord firmly. Once the engine runs, disengage the choke and let it idle for a moment. Only then raise the cutting wheel and bring the engine to operating speed. Never start the machine with the cutting wheel already touching the stump.
When the machine is running, position yourself behind the handles with a balanced stance. Keep your feet clear of the cutting wheel's path and maintain a firm grip. You should feel in control of the machine at all times, never fighting it.
Step 3: Grind the Stump with Controlled Movements
Grinding is a gradual process. Lower the cutting wheel onto the stump's outer edge and let the machine do the work. Do not force the wheel down or push it faster than the engine can handle. Controlled, sweeping movements across the stump's surface are far more effective than aggressive plunges.
Work from the outside in. Grind the outer edges first, lowering the stump progressively as you move towards the centre. This approach prevents the machine from binding and keeps the cutting wheel at a consistent depth. Each pass should remove a thin layer of wood, roughly 50 to 100 millimetres deep.
- Sweep side to side: Move the cutting wheel across the stump in a steady arc.
- Lower gradually: Drop the wheel a small amount with each pass.
- Let the machine cut: The engine should not labour. If it strains, raise the wheel and take a thinner cut.
- Watch the teeth: Stop if you hit metal or stone and inspect the cutting teeth for damage.
As you work, the stump will break apart into chips and fragments. These are normal by-products. Grind down to your target depth, which for most lawn restoration projects is 150 to 300 millimetres below ground level. This allows you to backfill the hole with soil and seed new grass.
For a comprehensive guide on the full removal process, including choosing the right machine for your stump size, review the practical advice on tree stump removal published by Agriculture Victoria.
Best Practices for Stump Removal and Cleanup
Grinding the stump down is only part of the job. Best practices for stump removal extend to what happens before you start and after you finish. A clean, professional result comes from attention to these details.
Before grinding, decide how deep you need to go. For a lawn you intend to reseed, grinding below ground level is essential. For an area you will turn into a garden bed, you may not need to go as deep. Matching the grind depth to your end goal saves time and effort.
After the stump is ground out, clear the wood chips and debris from the hole. These chips are rich in carbon and can deplete soil nitrogen as they break down, which is not ideal for new grass. Remove the bulk of the material, then backfill with quality topsoil.
- Collect the chips: Use them as mulch in garden beds or dispose of them responsibly.
- Backfill the hole: Fill with topsoil and firm it down gently to prevent settling.
- Seed or turf: Once the hole is level with the surrounding lawn, sow grass seed or lay turf.
- Water regularly: New grass needs consistent moisture to establish.
Common Stump Grinder Problems and Troubleshooting
Even with careful operation, issues can arise. Knowing how to diagnose and address common problems keeps your project on track and prevents minor faults from becoming dangerous situations. Here is a quick reference for what to check when something goes wrong.
| Problem | Likely Cause | What to Do |
|---|---|---|
| Cutting wheel won't lower | Hydraulic or mechanical blockage | Stop the engine, inspect the mechanism, and clear any obstruction |
| Engine labours or stalls | Cutting too deep or too fast | Raise the wheel, let the engine recover, take thinner cuts |
| Excessive vibration | Damaged or dull cutting teeth | Stop and inspect the teeth; replace if chipped or worn |
| Wheel binds in the cut | Cutting against the grain or too deep | Raise the wheel and approach from a different angle |
| Machine won't start | Fuel or ignition issue | Check the fuel level, choke position, and spark plug lead |
If you are using a hire machine and encounter a fault you cannot resolve, stop and contact the hire provider. Do not attempt major repairs on equipment you do not own. A responsible provider will talk you through the issue or arrange a replacement.
Conclusion
Using a stump grinder safely comes down to preparation, the right gear, and controlled technique. Clear the site, wear proper protection, and let the machine work at its own pace. These habits protect you and deliver a cleaner result for your lawn.
The process we have outlined applies to any stump grinding job, whether you are clearing space for a garden bed or restoring a patch of lawn. The principles remain the same: assess the site, respect the machine, and grind methodically. For most homeowners and DIY enthusiasts, hiring a machine for a day is the most practical path, and many find a self-drive stump grinder hire option suits their project well.
Frequently Asked Questions
What personal protective equipment is required for stump grinding?
Stump grinder safety gear is non-negotiable. You need safety glasses or a full face shield to protect against flying wood chips and debris. Wear hearing protection like earmuffs, as the 15HP petrol engine is loud. Heavy-duty gloves give you a firm grip, and steel-capped boots protect your feet if the machine rolls. Long trousers and a long-sleeved shirt add a layer of protection. Never operate the grinder without this basic safety gear.
How deep should I grind a tree stump?
For most residential lawns, grinding a stump to 150-200mm below ground level is sufficient. This depth allows you to backfill the hole with soil and topsoil, then reseed or lay new turf. If you plan to drive over the area or build a structure, you may need to grind deeper. Check for buried services like water pipes or irrigation lines before you start, especially if you are grinding near the house.
Do I need to clear debris before starting the stump grinder?
Yes, you must clear the area around the stump before you begin. Remove rocks, loose branches, and other debris that could become projectiles or damage the cutting teeth. Use a rake and shovel to expose the top of the stump and clear a working radius of at least one metre. This gives you a stable footing and a clear path to manoeuvre the machine safely.
How do I safely manoeuvre a stump grinder around the yard?
Before moving the grinder, stop the cutting wheel completely. When the machine is running, always keep a firm grip on the handles and move at a slow, controlled pace. Push the grinder, do not pull it towardss you. On slopes, work across the incline rather than up and down it to maintain balance. When transporting the unit, ensure it is properly secured on a trailer. For help choosing the right machine for your job, check our stump grinder hire options.
Grinding a stump is a satisfying job when it goes smoothly. The key is not to rush the safety fundamentals. At MarKay Outdoors, we keep our equipment well-maintained and ready for pickup, with flexible hire periods to suit your schedule. If you have a stump to remove and want a dependable machine without the hassle, explore our range and book your hire today.